In this blog post, we’ll guide you through setting up Google Ads conversion tracking on your Shopify store. This useful tool helps you keep an eye on what customers do on your website after clicking your ads.
With Google Ads tracking, you’ll discover which of your ads bring in the most sales for your store, so you can make informed decisions to boost your e-commerce success. Ready to dive in?
Installing Google Conversion Tracking on your Shopify
As we dive into the process of setting up Google conversion tracking, you’ll find two main pathways to choose from. The first is through the Shopify app, Google, & YouTube, while the second involves manual configuration.
Not to worry, we’re here to guide you through both methods, step by step.
Automatically installing Google conversion tracking
Using the “Google and YouTube” app on Shopify is one of the more straightforward methods for setting up Google Ads conversion tracking, making it a user-friendly choice. However, the “easiest” method can vary depending on your familiarity with the Shopify platform and your specific needs.
The app streamlines the process and is generally suitable for those who prefer a simpler, more automated approach. It’s a good choice if you’re looking for a hassle-free way to implement conversion tracking. It also has the advantage of being regularly updated to align with changes in Google Ads and Shopify.
Store requirement
To use the potential of the Google & YouTube channels for your Shopify store, make sure your online business meets the Google Merchant Centre standards. Let’s break it down into simple terms:
Online Store Accessibility: Your online store should be created on Shopify, and it must be open to customers without any password protection.
Payment Provider: You need to integrate a valid payment provider within your Shopify admin to securely process customer payments.
Store Policies: Ensure that your online store features a Refund Policy and Terms of Service, conveniently accessible via the store’s footer menu. Use the setup checklist if these policies are missing.
Contact Information: Display your contact details, including at least one contact method such as an email address, phone number, mailing address, or a contact form, on one of your store’s pages for customer visibility.
Shipping and Currency Alignment: Configure your store to ship to one of the supported countries and set the selling currency to match the target country, promoting a smoother shopping experience for customers.
By meeting these requirements, your store is good to to use the Google & YouTube app.
Also, for setting up your Google ads conversion tracking you need to have a Google Merchant Center account. The account is free.
Step-by-step guide for Google Ads conversion tracking install
As mentioned, we’ll cover how to install Google Ads conversion tracking automatically. Let’s go through it step-by-step.
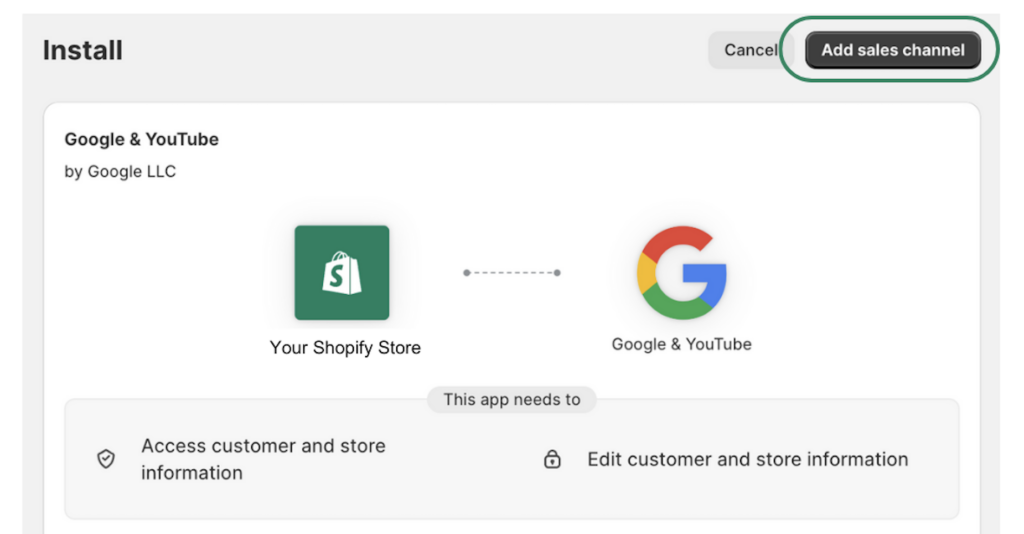
Log in to your Shopify account, go to the Google & YouTube app, and click ‘Add app.’
Authorize the connection by clicking ‘Add sales channel‘ on the next page.
- Link your Google account to Shopify by selecting ‘Connect Google account.’
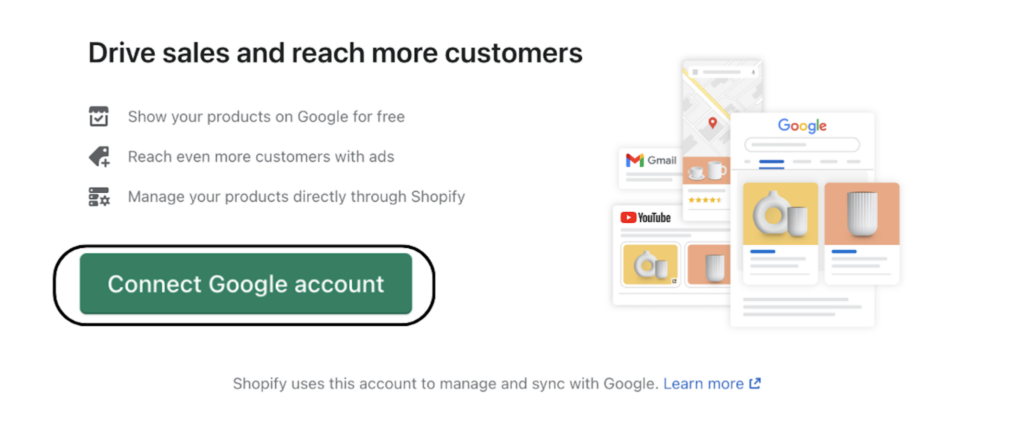
- If you haven’t met all the requirements, a checklist will guide you through the necessary steps.
- Connect your previously created Google Merchant Account (GMA) – it may auto-populate if using the same email.
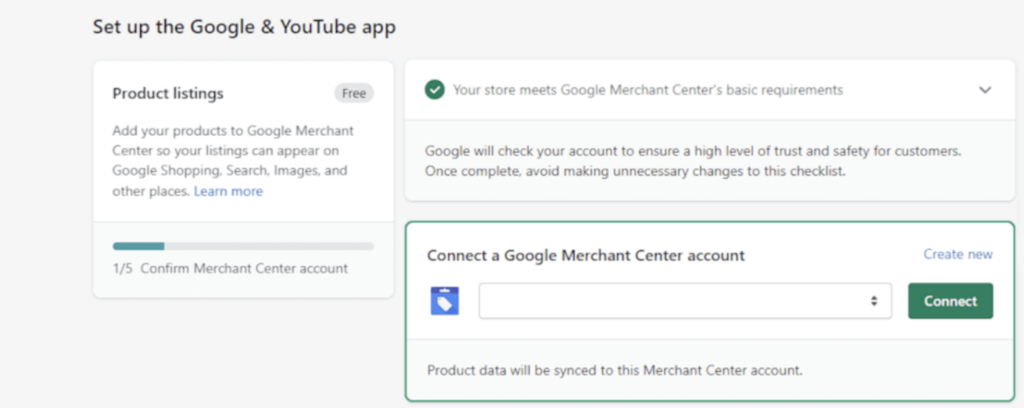
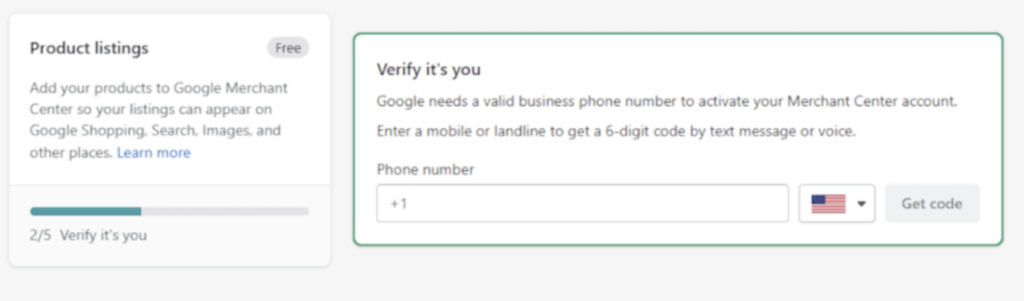
- Verify your identity via phone by adding your number and the code you receive.
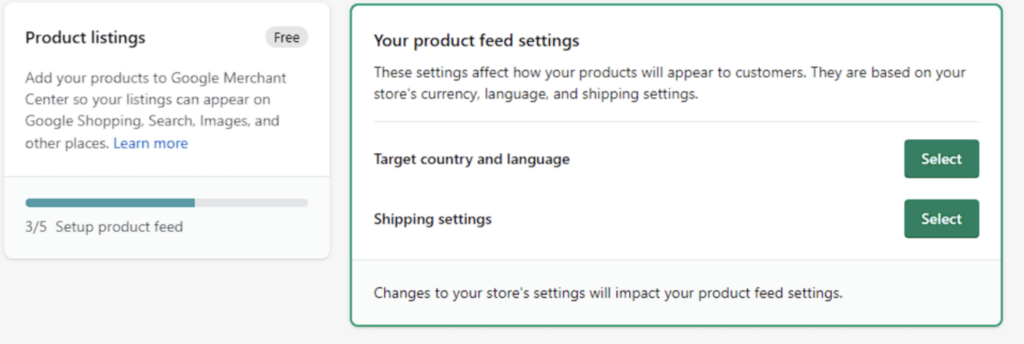
- Set up product feed settings for Google Search, Shopping, and Images by adding your shipping details using the boxes below.
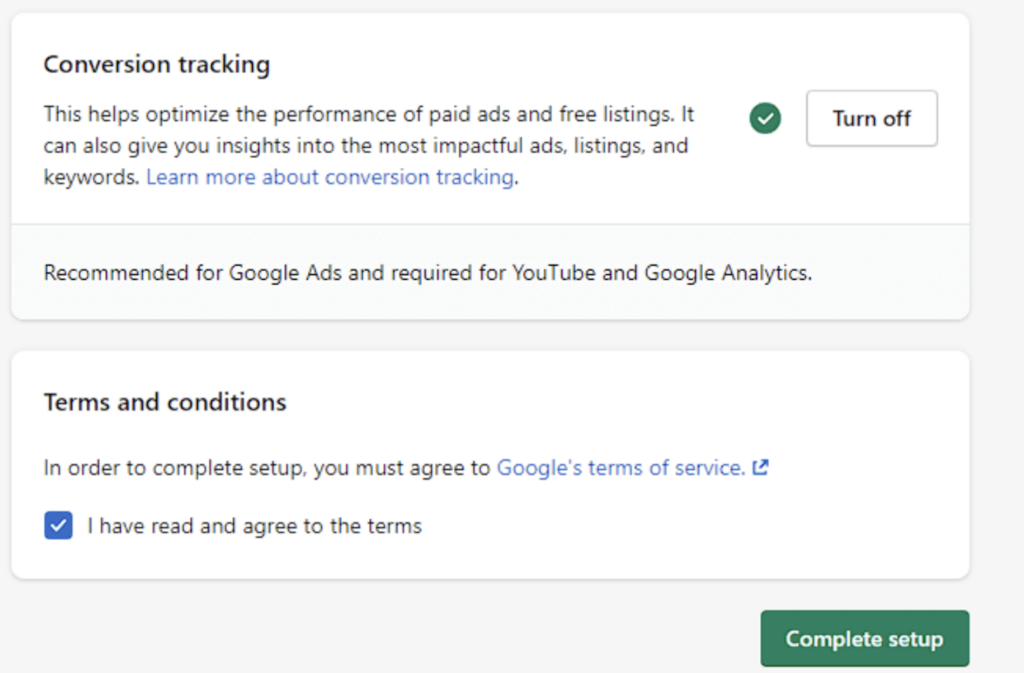
- Accept the terms and conditions to complete the setup.
And there you have it! While it might take up to an hour for all your products to sync with the Google Merchant Center, you can be confident that your tracking is fully operational and good to go!
Before you Manually Install Google Ads Conversion Tracking
Before you set up custom Google conversion tracking, make sure you don’t already have conversion tracking events in your Google Ads account. If you’re using Shopify’s Google & YouTube app, it automatically adds tracking events during setup.
If you set up custom tracking when there’s already tracking in place, you might have duplicate events. This can lead to inaccurate reports and issues with ad optimization. If you need to deactivate duplicate tracking events, ensure you only deactivate the duplicates. Turning off non-duplicate events can affect ad tracking accuracy and efficiency.
To check if your conversion tracking is set up correctly and detect any issues, you can use Lebesgue. Lebesgue automatically analyzes your performance across Google, identifying critical setup mistakes or problems with your conversion tracking that might be negatively impacting your campaigns.
Manually installing Google conversion tracking
Setting up Google Ads conversion tracking manually can be more technically challenging and time-consuming compared to using the Google & YouTube app on Shopify. The app is designed to simplify the process, making it accessible to users without in-depth technical knowledge.
Manual setup typically involves editing your store’s code, specifically adding the global site tag and event snippets to the relevant pages. This can be trickier, especially if you’re not comfortable with coding. It also requires a good understanding of how Google Ads tracking works. But, let’s cover the process of manually installing Google Ads conversion tracking step-by-step.
Create a conversion action in Google Ads
First, you need to create a conversion action in Google Ads. Here are the steps how to do so:
Sign in to your Google Ads account, where you’ll create the conversion action.
In Google Ads, go to “Tools & Settings” and select “Conversions.” Click the plus button to create a new conversion action.
- Choose “Website” as the source and select the category that best fits your conversion.
- Follow the prompts to set up the conversion details, such as the conversion name, value, counting, and attribution model. Make sure to select “Use a different value for each conversion” if your conversions have different values.
Install the Global Site Tag
Once you are done with the previously mentioned steps, Google will provide you with a global site tag and an event snippet.
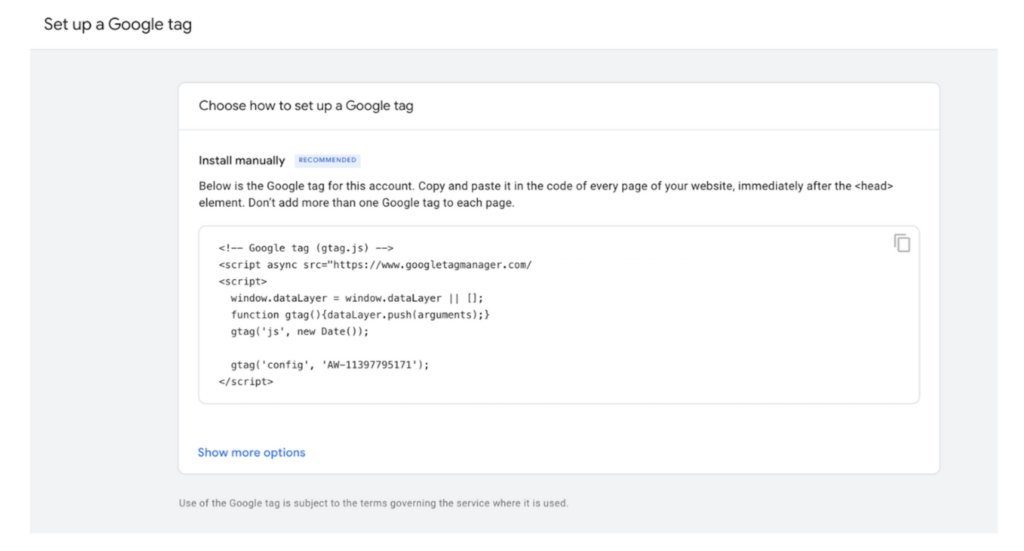
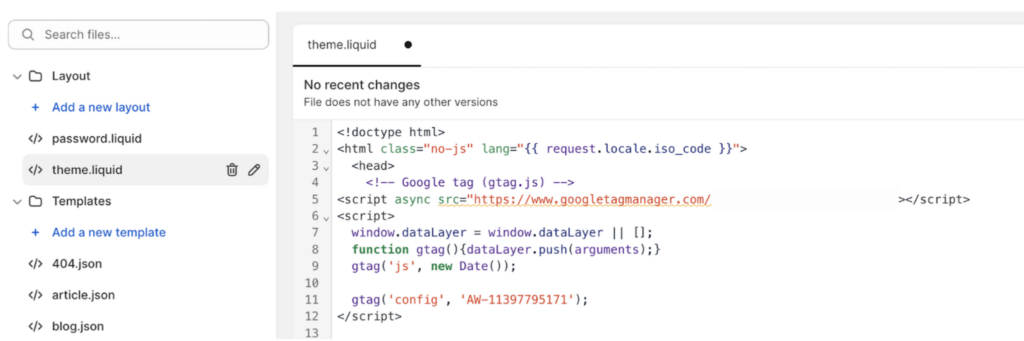
- Copy the global site tag and add it to your Shopify store. You can do this by editing your theme code in the Shopify admin under “Online Store” > “Themes” > “Actions” > “Edit code.” Paste the global site tag into the <head> section of your theme.liquid file.
We’re almost done! There is just one step left. Let’s see how you can add the event snippet to your store.
Add the event snippet to Shopify
The last step is to copy the event snippet provided by Google and paste it on the specific page where you want to track the conversion.
Access Your Shopify Admin: Log in to your Shopify admin dashboard.
Navigate to the Online Store: From the Shopify admin, go to “Online Store.”
Edit Your Theme Code: In the “Online Store” section, click on “Themes.” Then, click on the “Actions” button and select “Edit code.”
Locate the Specific Page Code: In the code editor, find and open the specific page where you want to track the conversion. In your case, it’s likely the “Thank You” or order confirmation page. This page’s code is usually found in a liquid template file like “thank_you.liquid” or “order-confirmation.liquid.” If you’re unsure which file corresponds to the “Thank You” page, you may need to consult your theme’s documentation or a developer.
Paste the Event Snippet: Once you’ve opened the correct page’s code, paste the Google Ads event snippet provided by Google where you want the tracking to occur. Typically, you should place the snippet just before the closing </head> tag or just before the closing </body> tag.
Save Your Changes: After pasting the snippet, save your changes in the code editor.
For e-commerce businesses, you want to track when the customer actually purchases your product. So, placing the snippet on the “Thank You” page ensures that the conversion is only tracked when a successful order is completed.
Conversion Tracking Data
If you’re not seeing any conversion value or if you’re noticing incorrect conversion data in your Google Ads account, there are several steps you can take to diagnose and address the issue.
First and foremost, it’s crucial to check the tracking code. Verify that the Google Ads tracking code has been correctly implemented on your “Thank You” or conversion page and that it’s in the right place within the page’s code.
Next, make a test conversion on your store, such as completing a test purchase. This action will help you verify if the tracking code is working as expected. After the test conversion, check your Google Ads account to see if it records the conversion correctly.
Additionally, ensure that you’ve configured the correct conversion value in your Google Ads account, especially if your store has multiple products with varying prices.
Attribution model
Consider the attribution model you’re using, as different models assign different values to conversions, which can impact what you see in your reports. It’s also essential to be patient, as there may be a delay between a conversion occurring and it being reported in your Google Ads account. Allow some time for data to be processed and updated.
Look for duplicate conversions as they can skew your data. Sometimes, the tracking code implementation on multiple pages or incorrect setup can lead to double-counting conversions. Ensure that the currency in your Google Ads account matches the currency used in your Shopify store, as mismatched currencies can lead to incorrect conversion values.
Review your Google Ads account settings
Review your Google Ads account settings, especially filters and settings that might affect how conversions are counted. If you’re using Google Analytics in conjunction with Google Ads, make sure that both platforms are set up correctly and that there are no discrepancies between the data.
Finally, if the issue persists, consider reaching out to Google Ads support for further guidance and troubleshooting. Having accurate conversion data is essential for making informed decisions about your advertising campaigns and optimizing your return on investment (ROI).
Next Steps For Conversion Tracking
After you’ve successfully added the Google Ads conversion tracking to your Shopify store, your next steps should be:
Testing the Setup: It’s crucial to verify that your tracking is working correctly. Make a test conversion, such as completing a purchase on your store, and ensure that the data is being recorded in your Google Ads account. This step confirms that your tracking is accurately monitoring conversions.
Monitoring Performance: Once your tracking is set up and validated, regularly monitor the performance of your advertising campaigns in Google Ads. Pay attention to how different ad groups and keywords are contributing to conversions.
Data Analysis: Analyze the conversion data to understand which ads and keywords are generating the most conversions and revenue. Use this information to adjust your ad spend, bidding strategies, and ad creatives to maximize your return on investment (ROI).
Optimization: Continuously optimize your campaigns based on the conversion data. Experiment with different ad copy, landing pages, and targeting options to improve your campaign’s performance. Regularly review and adjust your budget allocation to ensure it aligns with your business goals.
Summing Up
To sum it up, we hope this blog post makes setting up Google Ads conversion tracking easier for those who might be finding it challenging. We know that accurate tracking is vital for online advertising success.
That’s where Lebesgue comes in – it helps ensure your data is error-free, so you can run successful ad campaigns with confidence. With the insights from this blog post and Lebesgue’s assistance, you’ll be all set to navigate the digital advertising world and make informed decisions that bring you closer to your marketing goals.