Tracking conversions is essential for running Google Ads for your Shopify store because it allows you to measure how effectively your ads generate sales or leads. By monitoring conversion data, you can optimize your campaigns by adjusting bids, ad copy, and targeting based on what drives the most conversions.
You should consider adding a custom purchase event to your Shopify store when you want to gain deeper insights into customer behavior and improve your marketing strategies.
So, in this blog post, we’ll cover how you can create a purchase event in your Google Ads account, and how to set it up on your Shopify.
Google Ads Conversion Tracking
Google Ads conversion tracking allows advertisers to measure the effectiveness of their advertising campaigns by tracking specific actions users take after interacting with their ads. These actions, known as conversions, can include purchases, sign-ups, downloads, or any other valuable actions that contribute to your business goals.
For eCommerce stores, the most crucial conversion is the purchase, making it essential to have accurate data. If the tracking code is not implemented correctly, it can lead to errors and double counting.
Let’s explore how to properly implement the purchase event on your Shopify store.
Setting Purchase Event in Google Ads
First things first, let’s create a purchase event in Google Ads.
To create a purchase event in Google Ads, follow these steps:
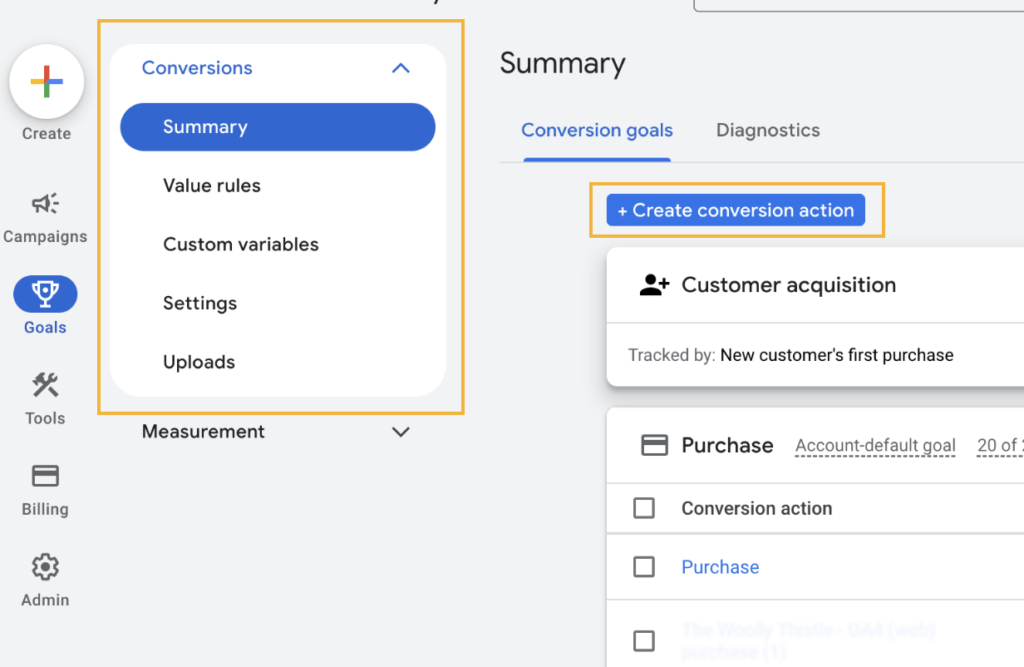
First, you’ll need to go to your Google Ads Account. From the dashboard, navigate to the “Summary” section and click on Create Conversion Action.
Once you’re on the conversion setup page, select the option to Start Tracking Conversions and choose Website as the source.
Then, input the URL of your website and click Scan to allow Google to check your site.
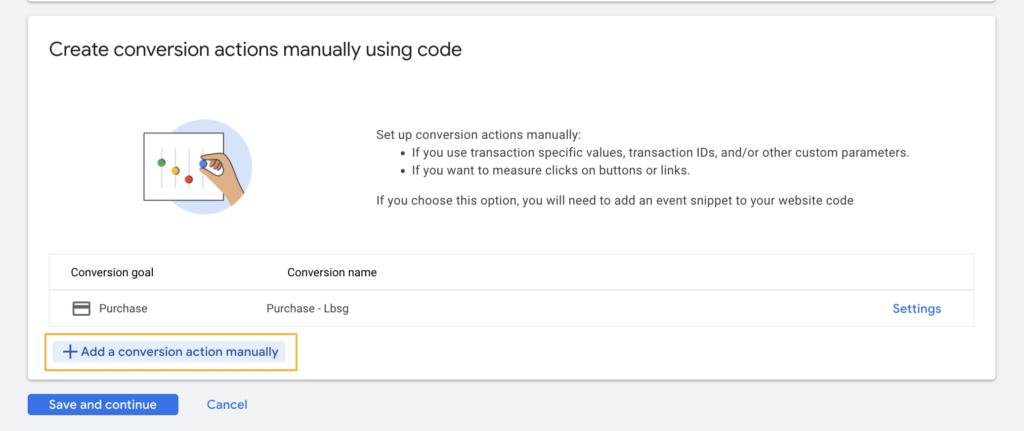
Select the option to Add Conversion Action Manually Using Code, which allows you to implement the purchase event using tracking code.
For the goal of the conversion, choose Purchase to track completed sales as the primary action.

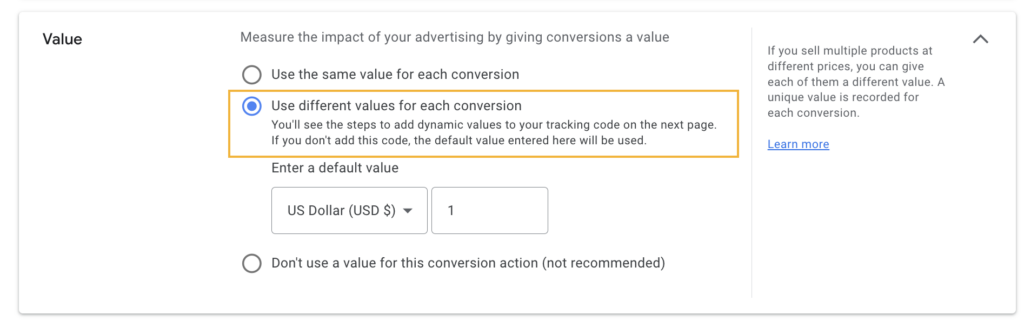
Select Use Different Values for Each Conversion if you want to track varying purchase amounts based on product prices.
Choose Count Every Click to track every conversion, which is ideal for tracking all individual purchases.

Click Save and Continue to finalize the setup. You’ve now successfully created a custom purchase event in Google Ads.
Following these steps will allow you to track purchase conversions accurately, helping you optimize your campaigns for sales.
Connecting Purchase Event With Shopify Store
Now that you’ve created a custom event in your Google Ads account, the next step is to add the code to your Shopify store.
We’ve also covered this in the video, so if you prefer watching instead, feel free to check it out!
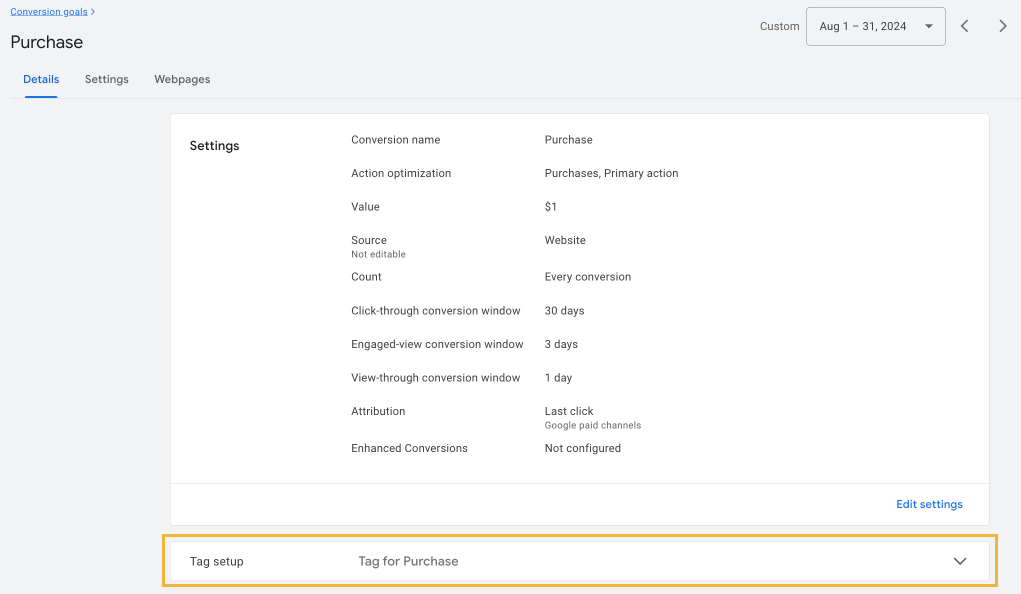
Start by copying the Google Ads purchase event tracking code. To find it, go to Conversions in your Google Ads dashboard, then navigate to Summary. Click on the Purchase event and select Tag Setup.
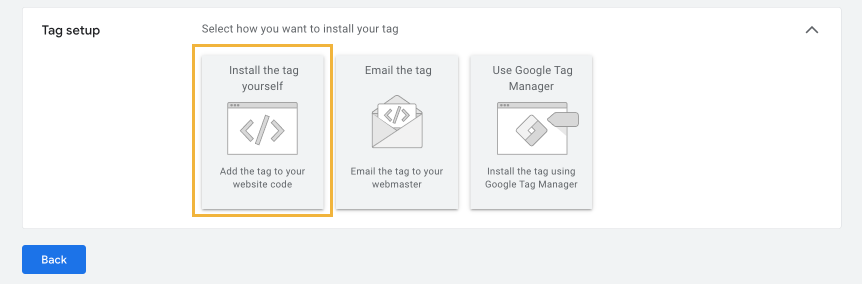
From there, choose the option to Install the Tag Yourself. You’ll then see the Google tag code and the event snippet, which you need to copy and paste into your Shopify store.
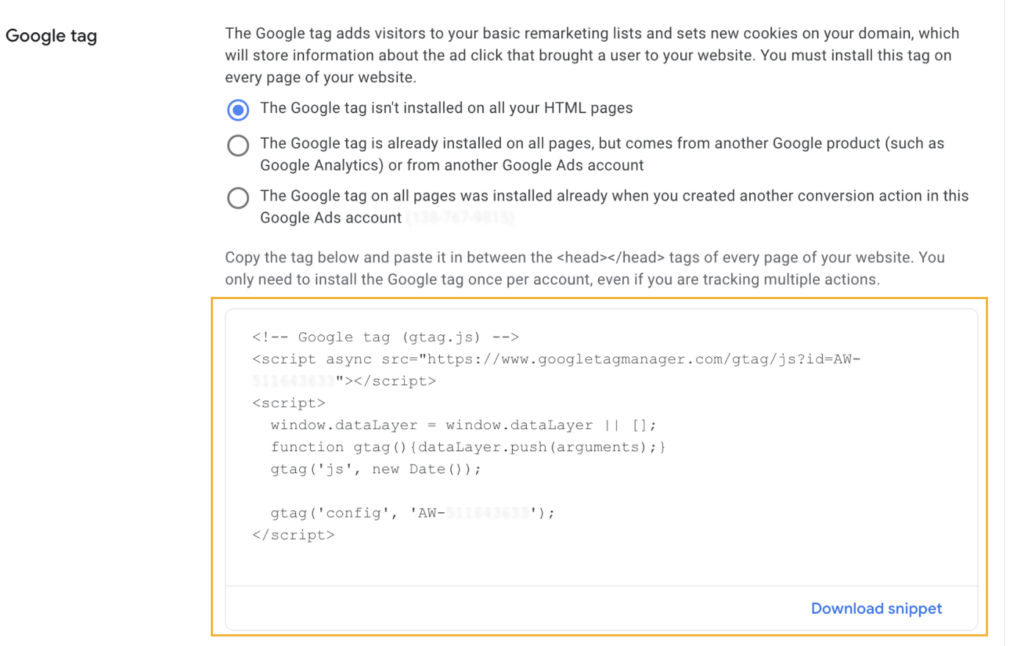
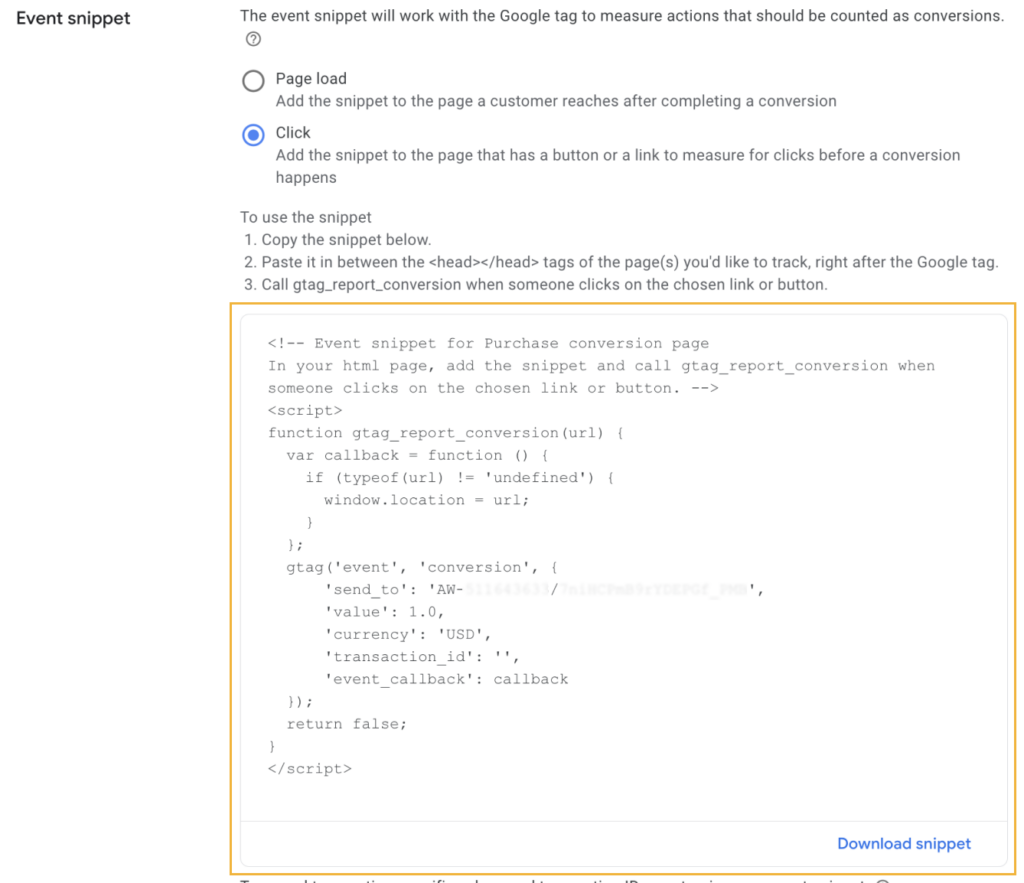
Now that you know where the Google Tag code and Event snippet are, let’s paste them into your Shopify store.
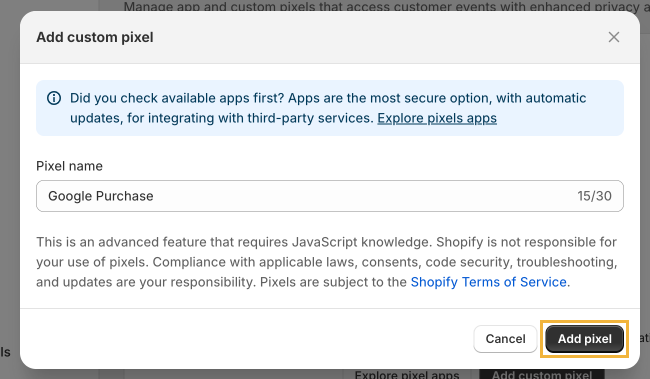
The first step is to create a custom pixel for your Shopify store. To do so, go to Settings > Customer events.
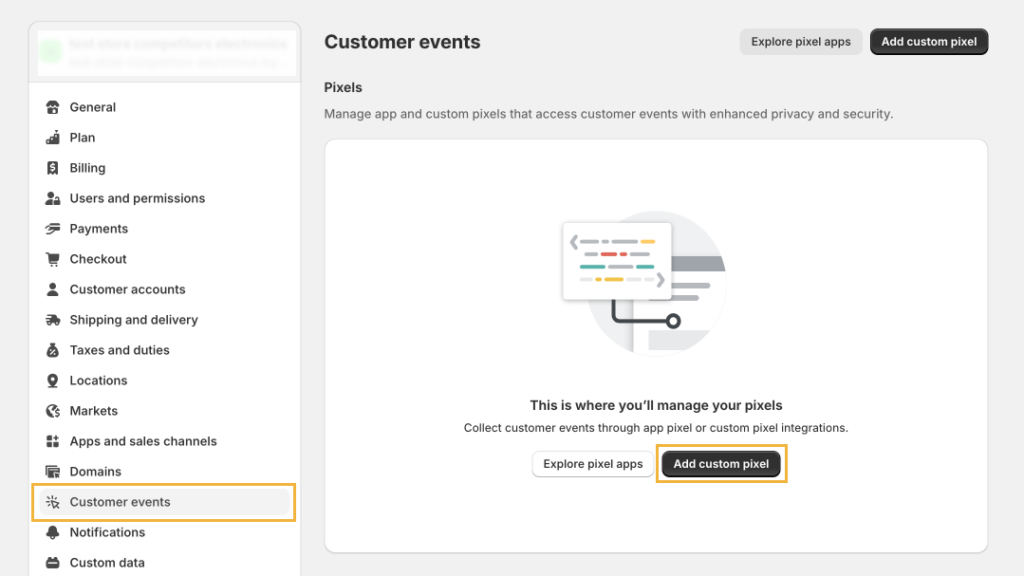
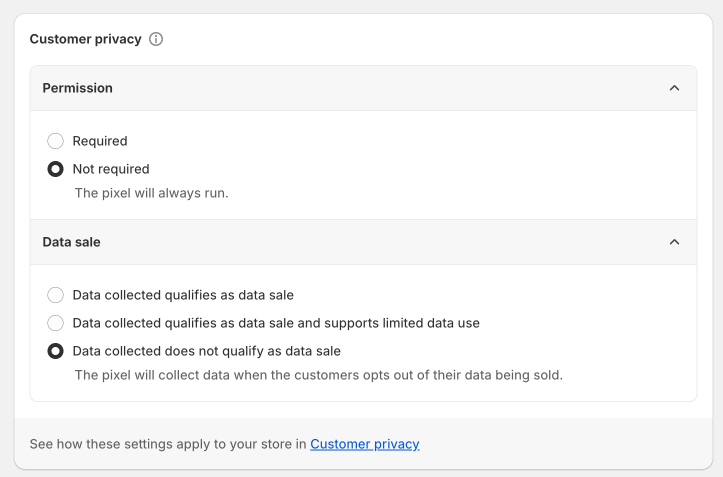
For Customer privacy select:
- Not required, and
- Data collected does not qualify as data sale.
Next, paste this code into the code section.
NOTE: Change the conversion label and AW with your code that you can find at Google Ads Snippet Event.
					//gtag starts here
const script = document.createElement(‘script’);
script.setAttribute(‘src’, ‘https://www.googletagmanager.com/gtag/js?id=AW-111111111’);
script.setAttribute(‘async’, ‘’);
document.head.appendChild(script);
window.dataLayer = window.dataLayer || [];
function gtag(){dataLayer.push(arguments);}
gtag(‘js’, new Date());
gtag(‘config’, ‘AW-111111111’);
//gtag ends here
//ec + purchase code starts here
analytics.subscribe(“checkout_completed”, (event) => {
  gtag(‘set’, ‘user_data’, {
    “email”: event.data.checkout.email,
    “phone_number”: event.data.checkout.phone
  });
  gtag(‘event’, ‘conversion’, {
    ‘send_to’: ‘AW-111111111/1niABCmB9rYDEABf_PMB’,
    ‘value’: event.data.checkout.totalPrice.amount,
    ‘transaction_id’: event.data.checkout.order.id,
    ‘currency’: event.data.checkout.currencyCode
  });
});
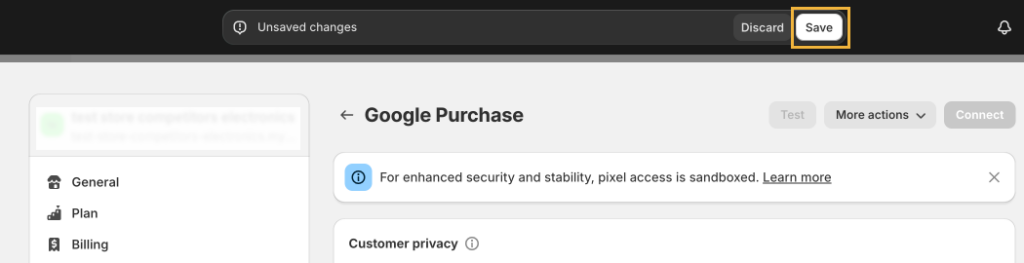
After that, you only need to click on Save and Connect.
Now that you created the Custom event on your Shopify, there is one more step you need to take.
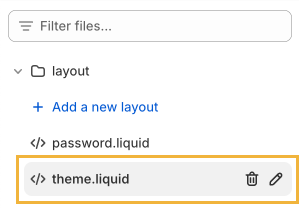
Go to your Theme and click on Customize. From there you’ll need to click on Edit code.
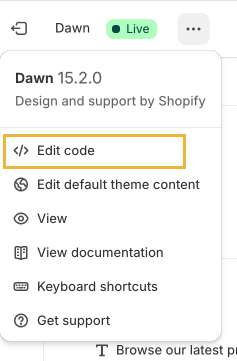
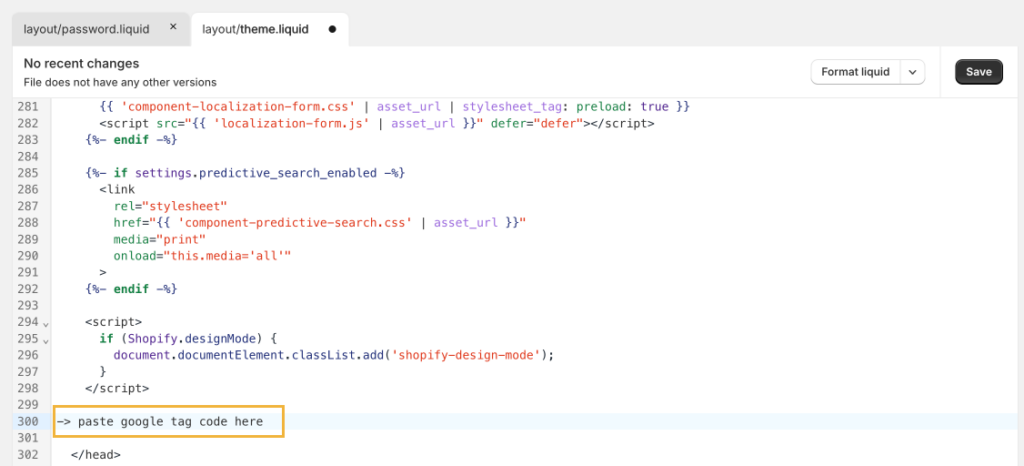
When you select </>theme.liquid option you can paste your Google tag code that we created in the Google Ads dashboard.
Summing Up
This is the correct way to set up a purchase event in Google Ads for your Shopify store. Implementing it properly ensures accurate tracking of sales data, allowing you to make informed decisions based on real insights.
With the right setup, you can optimize your ad campaigns, reduce wasted ad spend, and focus on the strategies that drive the most conversions.
Additionally, tracking purchase events enables better performance analysis, helps with remarketing, and improves overall return on investment.