Installing the Microsoft Ads UET tag is a key step in running successful ad campaigns. It allows you to track what visitors do after clicking your ad—whether they view products, add to cart, or complete a purchase—so you can measure performance and optimize results.
There are two main ways to handle tracking:
Third-party tracking
Uses tags provided by platforms like Microsoft Ads. These tags send user behavior data directly back to the ad platform to improve targeting and performance.First-party tracking
Involves server-side tools like Le Pixel, which gather data from multiple platforms and provide a more complete, cross-channel view of your marketing effectiveness.
In this guide, we’ll focus on setting up the Microsoft Ads UET tag on a Shopify store, broken down into two phases:
Phase 1: Add the baseline UET tag to track page views and user behavior
Phase 2: Set up conversion tracking to capture purchases and other key actions
Let’s get started with Phase 1.
Installing the Baseline UET Tag on Your Shopify Store
In this phase, you’ll add the Microsoft Ads UET tag to your Shopify theme so that every page view is tracked. This step lays the foundation for all future tracking, including conversions.
Step 1: Get Your UET Tag Code
First, you need to generate your tag inside Microsoft Ads:
Log in to your Microsoft Ads account
Go to Tools → UET tags
If you haven’t already, click Create UET tag
Once created, copy the full JavaScript code snippet provided
This snippet will be added to your Shopify theme to start tracking page visits.

Step 2: Add the Tag to Your Shopify Theme
Next, insert the UET tag into your site’s code so it loads on every page.
In Shopify Admin, go to:
Online Store → Themes → Actions → Edit CodeOpen the
theme.liquidfile (this controls your site’s HTML layout)Find the
</head>tag near the top of the filePaste the code just above that closing
</head>tag- Click Save in the top-right corner.
Here’s the full code (remember to replace the placeholder with your actual tag ID):
					<script>
(function(w,d,t,r,u){
  var f,n,i;
  w[u]=w[u]||[];
  f=function(){
    var o={ti:"INSERT_UET_TAG_ID", enableAutoSpaTracking: true};
    o.q=w[u];
    w[u]=new UET(o);
    w[u].push("pageLoad");
  };
  n=d.createElement(t);
  n.src=r;
  n.async=1;
  n.onload=n.onreadystatechange=function(){
    var s=this.readyState;
    s && s!=="loaded" && s!=="complete" || (f(),n.onload=n.onreadystatechange=null);
  };
  i=d.getElementsByTagName(t)[0];
  i.parentNode.insertBefore(n,i);
})(window,document,"script","//bat.bing.com/bat.js","uetq");
</script>
Step 3: Verify That the Tag Is Working
Once installed, check that the tag is active:
Go back to Microsoft Ads → Tools → UET Tags
Find your tag and look for “Tracking status: Active”
You can also install the UET Tag Helper Chrome extension to test that the tag is firing on your site
Setting Up Conversion Tracking in Shopify
Once your UET tag is installed, the next step is to track specific events—like purchases—so Microsoft Ads can attribute conversions properly. This gives you clearer insight into how your ads are performing and helps optimize campaigns based on real results.
Step 1: Create a Conversion Goal in Microsoft Ads
You’ll define what kind of event Microsoft should consider a conversion (e.g. a purchase).
In your Microsoft Ads account, go to:
Tools → Conversions → GoalsClick Create to set up a new goal
Choose the following settings:
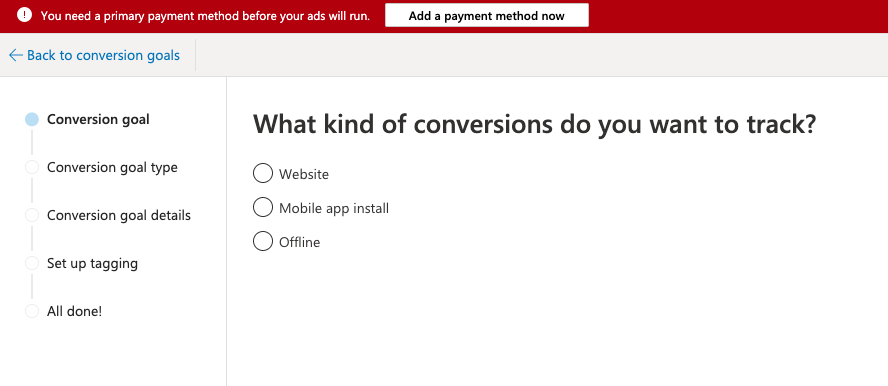
Goal Type: Website
Goal Category: Purchase
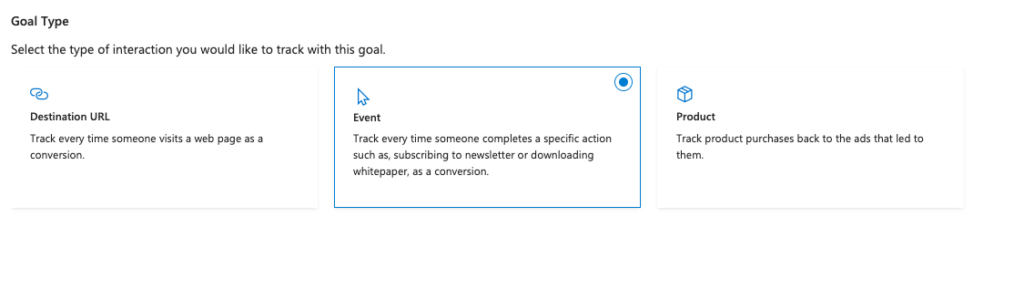
Goal Type: Event Goal
You’ll then move into the goal setup interface.
You want to define Website event. The goal of the event will be Purchase, and as a goal type, select Event Goal as below:
Furthermore, select your settings like this:

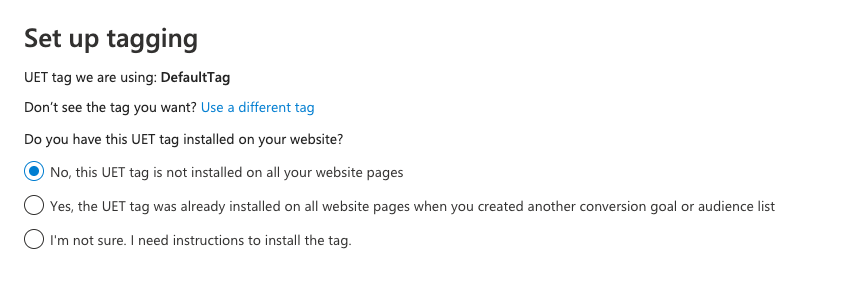
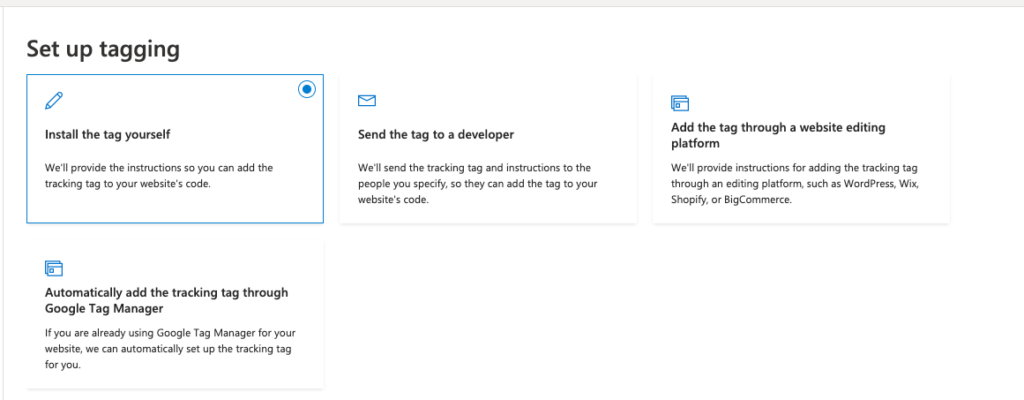
Step 2: Configure the Tag Settings
In the tagging section, you’ll be asked how the tracking will be implemented.
Select the option for when the UET tag is already added to your site via the theme (
theme.liquid)Then click “Install the tag yourself”
Microsoft Ads will show you a sample JavaScript snippet—you can ignore this, as we’ll use a more complete version tailored for Shopify checkout tracking
Copy your UET Tag ID (you’ll need it in the next step). We’ll refer to this as MICROSOFT_ADS_PIXEL_ID.
Step 3: Add a Custom Pixel in Shopify to Track Purchases
Now we’ll create a custom pixel that tracks completed checkouts.
Go to your Shopify Admin → Settings → Customer Events
Click “Add Custom Pixel” in the top right
Paste the following script (basic version) into the editor:
Basic Microsoft Ads Checkout Conversion Tracking:
					// Step 1. Initialize the UET pixel
(function(w,d,t,r,u){
  var f,n,i;
  w[u]=w[u]||[];
  f=function(){
    var o={ti:"MICROSOFT_ADS_PIXEL_ID", enableAutoSpaTracking: true};
    o.q=w[u];
    w[u]=new UET(o);
    w[u].push("pageLoad");
  };
  n=d.createElement(t);
  n.src=r;
  n.async=1;
  n.onload=n.onreadystatechange=function(){
    var s=this.readyState;
    s && s!=="loaded" && s!=="complete" || (f(),n.onload=n.onreadystatechange=null);
  };
  i=d.getElementsByTagName(t)[0];
  i.parentNode.insertBefore(n,i);
})(window,document,"script","//bat.bing.com/bat.js","uetq");

// Step 2. Track completed purchases
analytics.subscribe("checkout_completed", (event) => {
  window.uetq = window.uetq || [];
  window.uetq.push('event', 'purchase', {
    "revenue_value": event.data?.checkout?.totalPrice?.amount,
    "currency": event.data?.checkout?.currencyCode
  });
});
NOTE: Replace "MICROSOFT_ADS_PIXEL_ID" with your actual ID from Step 2.
This script listens for the checkout_completed event and sends revenue + currency data to Microsoft Ads when a purchase is made.
Optional: Add Enhanced Conversions (Email + Phone Tracking)
To improve attribution and help Microsoft Ads match more conversions, you can pass hashed customer identifiers like email and phone.
Here’s the enhanced version of the pixel:
Enhanced Conversion Tracking Script:
					// Step 1. Initialize the UET pixel
(function(w, d, t, r, u) {
  var f, n, i;
  w[u] = w[u] || [];
  f = function() {
    var o = { ti: "MICROSOFT_ADS_PIXEL_ID", enableAutoSpaTracking: true };
    o.q = w[u];
    w[u] = new UET(o);
    w[u].push("pageLoad");
  };
  n = d.createElement(t);
  n.src = r;
  n.async = 1;
  n.onload = n.onreadystatechange = function() {
    var s = this.readyState;
    s && s !== "loaded" && s !== "complete" || (f(), n.onload = n.onreadystatechange = null);
  };
  i = d.getElementsByTagName(t)[0];
  i.parentNode.insertBefore(n, i);
})(window, document, "script", "//bat.bing.com/bat.js", "uetq");

// Step 2. Track purchase and send customer identifiers
analytics.subscribe("checkout_completed", (event) => {
  window.uetq = window.uetq || [];

  // Enhanced conversion identifiers
  window.uetq.push('set', {
    'pid': {
      'em': "{{ checkout.email | escape }}",
      'ph': "{{ checkout.phone | escape }}"
    }
  });

  // Purchase event
  window.uetq.push('event', 'purchase', {
    "revenue_value": event.data?.checkout?.totalPrice?.amount,
    "currency": event.data?.checkout?.currencyCode
  });
});
Shopify will automatically replace {{ checkout.email }} and {{ checkout.phone }} with real customer data at runtime.
Microsoft’s UET system separates:
Global identifiers (like email or phone) — these are passed with the
setcommandConversion events — passed with the
eventcommand (e.g., a purchase)
It’s important to push set first, so the identifiers apply to any event that follows. If you try to include everything in a single event command, Microsoft will ignore the identifiers.
This separation helps Microsoft better attribute conversions and improve reporting accuracy across browsers and devices.
Summing Up
To set up Microsoft Ads tracking on your Shopify store, you’ll need to install the base UET tag to track page views and create a custom pixel to track conversions like purchases. Using analytics.subscribe, you can pass revenue and currency data directly to Microsoft Ads when a checkout is completed.
Once everything’s in place, use the UET Tag Helper to confirm your setup is working. For even more accurate results, tools like Le Pixel can help you unify tracking across all your ad channels.
This setup ensures your Microsoft Ads campaigns are properly tracked and optimized for real performance.