Google Tag Manager (GTM) can be implemented on any Shopify store, not just Shopify Plus. Both basic and advanced Shopify plans support the integration of GTM.
In this blog post, we’ll talk about what GTM is and how it helps your store. Next, we’ll give you a step-by-step guide, so you can easily set up GTM for your Shopify store, regardless of the plan you’re on.
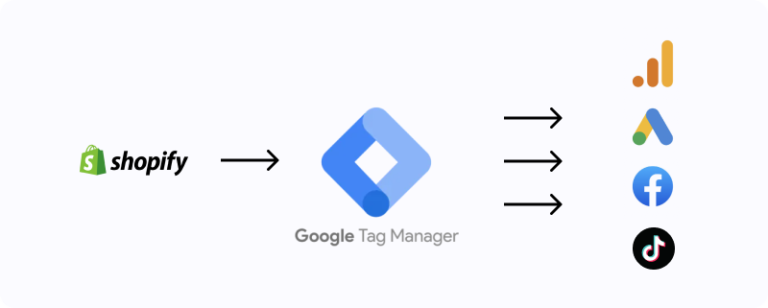
Why do you need GTM for your Shopify store?
GTM is designed to streamline the management of tracking codes and tags, making it easier for you to add, update, or remove scripts without directly editing your theme’s code.
When implemented correctly, GTM should not significantly impact your Shopify store’s page load speed. GTM loads tags asynchronously, which means it loads them in parallel with other elements on the page, reducing potential delays.
When it comes to website performance, the quantity and types of tags used can significantly impact page load speed. Moreover, the way in which these tags are configured can also affect overall performance.
To ensure your website runs seamlessly and loads quickly, it’s important to take action to reduce any potential negative effects on performance. With this in mind, let’s explore some actionable steps you can take to optimize your website’s performance:
1. Use only necessary tags
The first thing you can do is to use only the necessary tags. Keep the number of tags to a minimum and ensure they are essential for your store’s tracking and marketing purposes.
2. Optimize tag triggering
Next, set up tag triggers in a way that avoids unnecessary or redundant firing, which can potentially slow down the page load.
3. Monitor performance
Lastly, regularly assess your store’s performance using tools like Google PageSpeed Insights or Lighthouse to identify and address any bottlenecks related to GTM or other factors.
By carefully managing your tags and monitoring your store’s performance, you can ensure that GTM works efficiently and effectively for your Shopify store without causing a significant slowdown.
How to implement GTM on your Shopify store?
Now that you know why Google Tag Manager is important to your Shopify store, it’s time to see how to implement it. Don’t worry, we’ll give you a step-by-step guide for easy implementation.
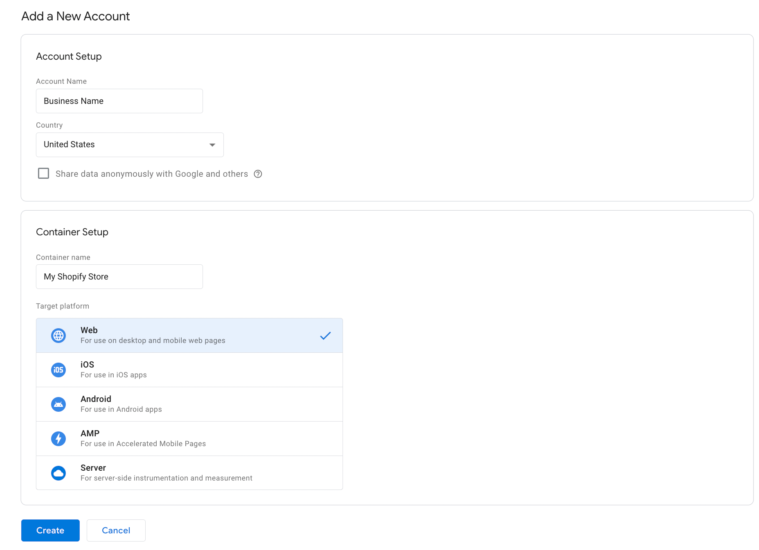
Step 1: Create a Google Tag Manager account
The first thing you need to do is to create a Google Tag Manager account. To do that, follow the next steps:
- Go to the Google Tag Manager website and sign in with your Google account. If you don’t have a Google account, you’ll need to create one.
- Click “Create Account” and enter your account name (usually your business name).
- Enter a container name (typically your Shopify store’s domain name) and select “Web” as the target platform.
- Agree to the terms of service, and your GTM account will be created with a unique container ID.
And that’s it. You created your Google Tag Manager account.
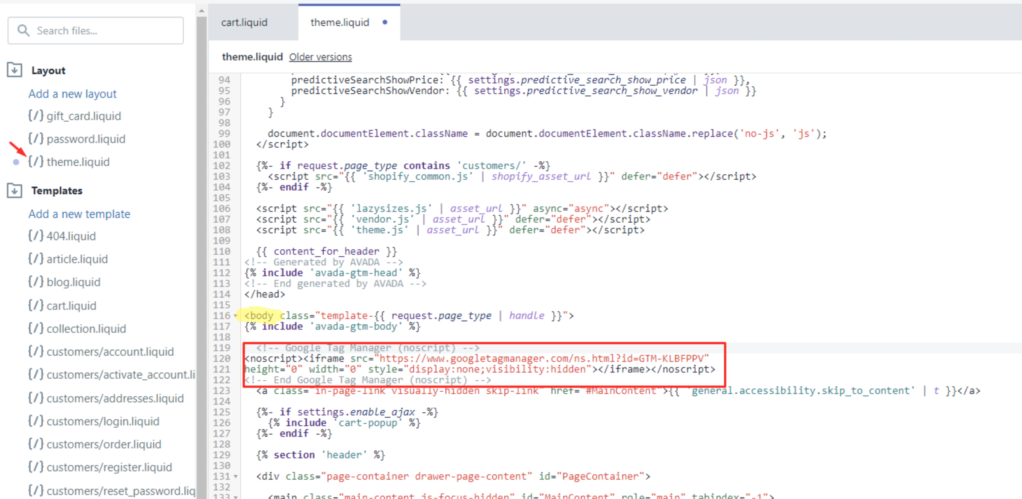
Step 2: Add GTM code to your Shopify store
After you create your Google Manager Tag account, it’s time to add GTM code to your Shopify store. Let’s see how you can do that.
- Copy the GTM container code snippets provided by Google Tag Manager. There are two parts: one for the head section and one for the body section of your website.
- Log in to your Shopify admin dashboard.
- Navigate to “Online Store” > “Themes”.
- Click “Actions” next to your active theme, and then click “Edit Code”.
- Locate the “theme.liquid” file in the “Layout” folder and click on it.
- Paste the first part of the GTM container code (the one meant for the head section) immediately after the opening <head> tag.
- Paste the second part of the GTM container code (the one meant for the body section) immediately after the opening <body> tag.
- Save your changes by clicking “Save” in the upper-right corner of the editor.
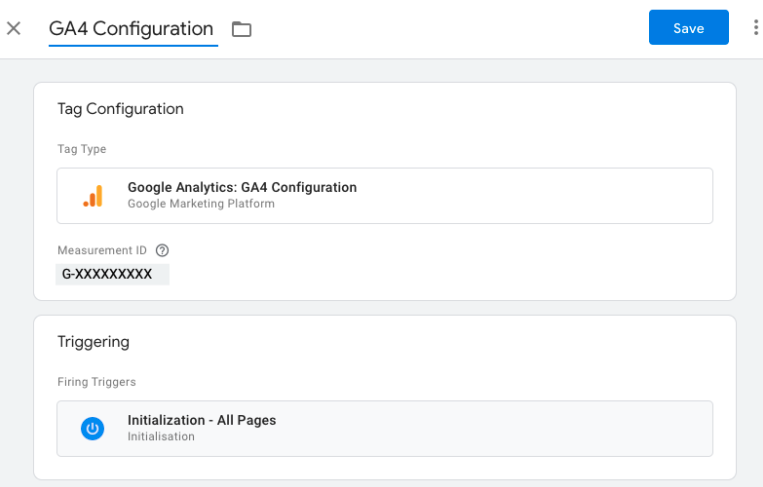
Step 3: Configure and publish tags in Google Tag Manager
And now that you added the GTM code to your Shopify store, the next step is to configure and publish tags in Google Tag Manager. Here are the steps on how you can do that:
- Return to your Google Tag Manager dashboard.
- Click “Add a new tag” to create a tag for a specific tracking script, such as Google Analytics, Facebook Pixel, or any other tracking code you’d like to implement.
- Choose the appropriate tag type, and enter the required information (e.g., Tracking ID for Google Analytics).
- Click on “Triggering” and choose or create a trigger for when the tag should fire (e.g., “All Pages” for Google Analytics).
- Save the tag, and repeat this process for any additional tags you’d like to implement.
- When you’ve added all necessary tags, click “Submit” in the upper-right corner, then click “Publish” to make your tags live.
Step 4: Verify GTM implementation
Hang on, we are at the end. All that is left to do is to verify GTM implementation.
- Install the Google Tag Assistant browser extension for Chrome to verify your tags are working correctly.
- Visit your Shopify store’s homepage with the extension enabled.
- Click on the Google Tag Assistant icon in your browser, and then click “Enable” to check your tags.
- The extension should display the tags you’ve set up in Google Tag Manager, indicating they are correctly implemented.
That’s it! You’ve successfully implemented Google Tag Manager on your Shopify store. You can now easily manage and update your tracking scripts and tags through the GTM dashboard without having to edit your Shopify theme’s code directly.
Summing Up
By properly implementing GTM on a Shopify store, you can gain valuable insights into customers’ behaviors, such as which pages they visit, how long they stay, and what actions they take. So, you can use this information to optimize the store’s design, layout, and content for better user engagement and increased conversions.
Overall, implementing GTM on a Shopify store can be a powerful tool for enhancing website performance and gaining a better understanding of your customers’ behaviors and preferences.