Over the years, Facebook has built a powerful ad management platform, which allows brands to carefully monitor and place ads to users through a wide range of targeting options and possible placements. One of the bigger problems they faced was creating an ad management platform for a wide range of businesses that were supposed to use it. Every company has its own marketing goals and metrics, and for those brands that want a more detailed analysis of their account performance data, Facebook provides another way to aggregate data: through its Marketing API.
At a basic level, Marketing API can be used for reporting purposes, but it also supports managing campaigns. In this blog post, we’ll explain how to start analyzing data using this API.
Let’s start with setting everything up, after which we will make a test call to see if everything works as it should.
Setting up the Marketing API
In this section, we guide you through the process of setting everything up, after which you should be able to send queries to Facebook and receive the requested data. The process differs depending on the purpose of the app.
For the purposes of this article, we assume that the tool will only be used for internal usage (reporting), not for developing commercial applications. If you wish to create commercial applications, the process is a bit different, primarily due to additional identity checks.
Open "Facebook Developers"
The first step of the process is to open the Facebook Developers page. After logging into your Facebook account, navigate to the “My Apps” page which is located in the upper right corner of the page, in the navigation bar. You should see a page similar to the following:
Create a new app
This part of the process is the same for all apps you can create with Facebook, so you will be asked to specify what the application will do. For our purposes, we will “Manage Business Integrations”, so choose the first option, like on the following screen, and click “Continue”.
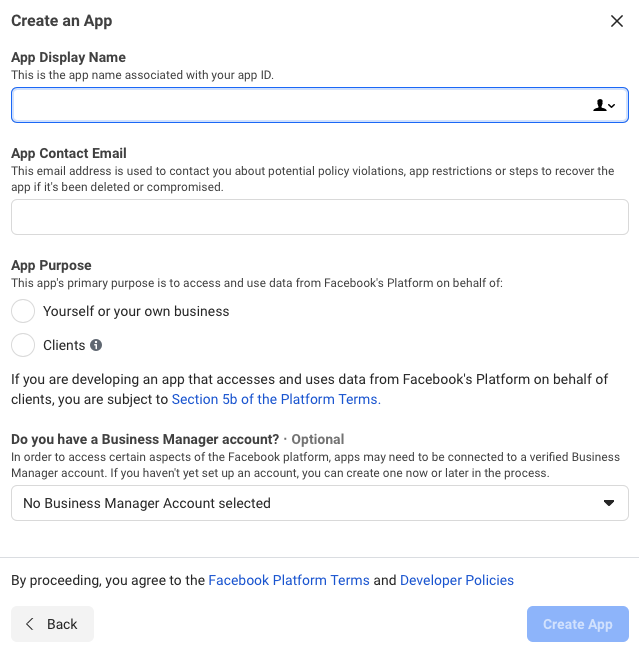
Fill Out the Form
On the next step, you should see a form asking you to name the app, add a contact email, and connect a business manager account (this last part is optional). You are also asked about the purpose of the app, and as we said before, in this case, we are interested in developing an internal app, so choose Yourself or your own business, and proceed to the next step by clicking “Create app”.
Set Up the "Marketing API"
After passing the security check (arguably the most difficult part of the process), you should see the main dashboard of your new app, and it should look something like the following image. Among the number of different functionalities offered by Facebook, we are interested in the “Marketing API” for now, so we click the “Set Up” button on the “Marketing API” product. There should be no additional steps.
Select Permissions and Generate the Access Token
We are almost done. In your app dashboard, click Tools → Graph API Explorer, which should lead you to a page similar to the image below. Click the “generate access token”, and you will receive a unique token from Facebook through which you can make API calls (communicate with Facebook servers). In the upper input field (next to the submit button), enter the following and press “submit”:
me?fields=id,name,adaccounts{name}
You should see a list of all ad accounts you have access to, along with their respective names. The “Name” property should be specified explicitly because Facebook works with IDs (a technical detail). If you get an error message, you may add additional permissions. Click the dropdown button for “Add a permission”, and add “ads_management”, to have the rights necessary to execute the call. For each new permission added, new access tokens will have to be generated.

Summing Up
Congratulations, you’ve made your first API call! It may not look impressive for now, but that’s because we spent most of the time setting everything up. In the next blog post, we dive a bit deeper into how to extract data from the platform using the API, and we give a couple of example queries that are often used.
If you have any problems with the setup, or you have any questions about extracting data, feel free to tell us in the comments. For more interesting content like this, visit our blog page.