Google Analytics 4 (GA4) is the most recent version of Google’s popular website analytics tool, and it’s available for Shopify store owners. GA4 offers a wealth of features that help you gain valuable insights into your store’s performance, customer behavior, and sales data.
It provides a more comprehensive view of your store’s performance than standard analytics solutions since it can track events and conversions.
The good news is that GA4 installation on your Shopify is quick and simple.
In this blog post, we’ll show you how to install Google Analytics 4 on your Shopify store so you can start collecting data and optimizing your business’ performance.
What is Google Analytics 4?
To begin, we’d like to start with what Google Analytics is and why you should use it.
According to Google “Google Analytics 4 is the next generation of analytics which collects event-based data from both websites and apps.”
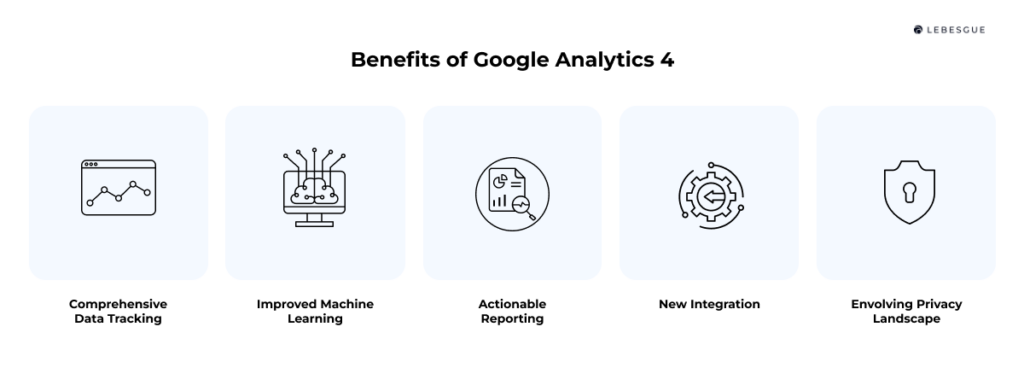
Using first-party, modeled data, Google Analytics 4 provides a comprehensive view of customer behavior across the web and app. Improved machine learning features, actionable reporting, and new integration assist you in adapting to an involved privacy and technology landscape to continue receiving the insights you rely on.
Benefits of Google Analytics 4 for Shopify stores
Now that you know what Google Analytics 4 is, let’s look at why you should use it for your Shopify store. There are several reasons why you should upgrade your Shopify store to GA4:
- Comprehensive Data Tracking: GA4 allows you to follow customer activity throughout the web and app, providing you with a comprehensive picture of your store’s success.
- Improved Machine Learning: GA4 uses advanced machine learning algorithms to deliver more accurate and useful insights about the performance of your shop.
- Actionable Reporting: GA4 reporting is meant to be simple to use and comprehend, giving you the data you need to make informed decisions.
- New Integration: GA4 now includes additional connectors with other Google products, allowing you to gain even more important information about the performance of your business.
- Evolving Privacy Landscape: With the ever-changing privacy landscape, GA4 is designed to adapt and keep you in compliance with your privacy regulations while still providing the insights you need.
On the whole, by upgrading to Google Analytics 4, you’ll be able to take advantage of these powerful features. With GA4, you will gain a more comprehensive understanding of your store’s performance.
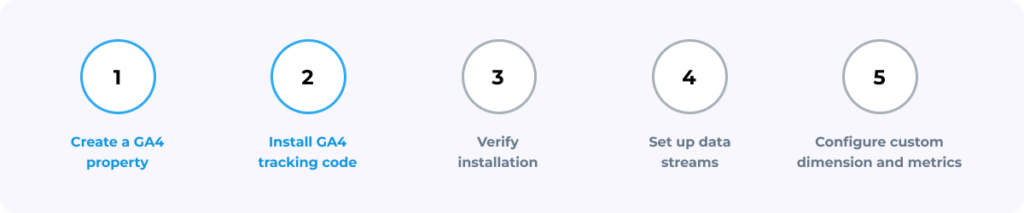
How to Install Google Analytics 4 on Shopify?
After exploring the benefits of Google Analytics 4 for Shopify, it’s time to see how to install it into your Shopify.
Before we start, we need to take into consideration whether you already have Google Analytics set up or if it’s all this new to you. We’ll begin with setting up Analytics data collection for the first time.
So, if you’re just looking to upgrade your Universal Analytics to Google Analytics 4 you can skip this part.
Set up Analytics Data Collection for the first time
The first step is to create an Analytics account unless you already have one. Creating a Google Analytics account is easy. All you need to do is to log into Google Analytics and:
- In Admin, in the Account Column, click Create Account
- Provide an account name. Configure the data-sharing settings to control which data you share with Google.
- Click Next to add the first property to the account.
And that’s it! You created a Google Analytics account.
Create a new Google Analytics 4 property
After you created an analytics account it’s time to create Google Analytics 4 property. To create a property log into your Google Analytics account and create a new GA4 property.
This will give you access to GA4’s reporting and data collection capabilities. Also, to create a property you will need to have an Editor role.
So, to create a new property you need to:
- Verify that the correct account has been selected in the Admin section by checking the Account column, then create a property by clicking the Property column.
- Edit a name for the property and select the reporting time zone and currency. Click next.
- Select your industry category and business size.
- Click Create and accept the Analytics Terms of Service and the Data Processing Amendment.
Add data steam
In this step, you will need to go to the Property column and click Data Streams > Add stream. Click Web.
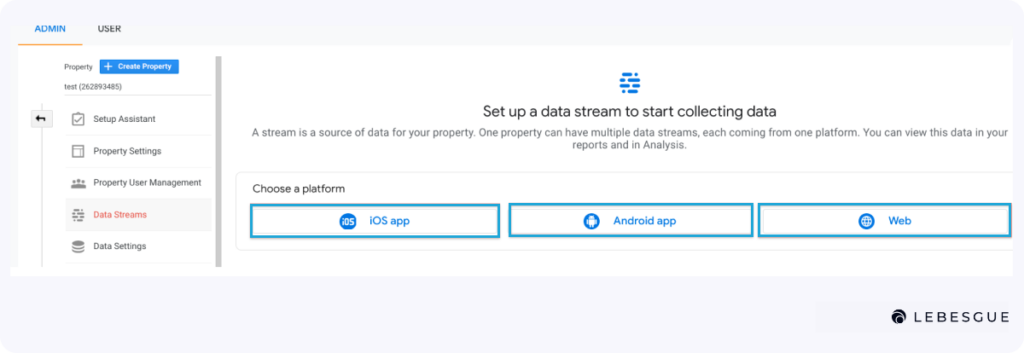
After clicking on Web, you need to enter the URL of your primary website.
Enabling enhanced measurement is optional, but it can save you time and effort by automatically collecting page views and other events.
If you decide to enable it, you can always go back and disable specific measurement events at a later time but Google recommends that you enable enhanced measurement.
And, the last step is to click on Create Stream.
Set up data collection for Shopify
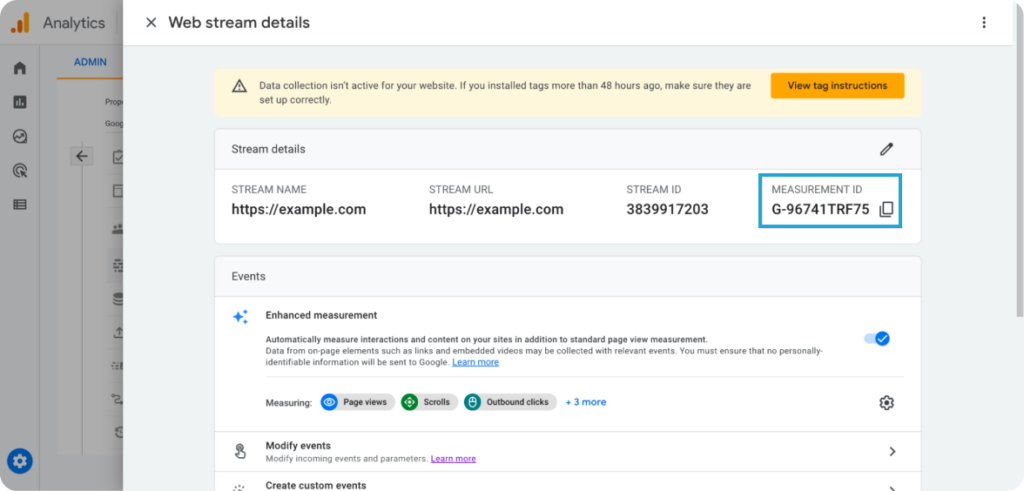
You must add the Google tag to your Shopify to begin collecting data for your new Google Analytics 4 site. To accomplish this, locate your “G-” ID and paste it into the Google Analytics section on your Shopify admin.
To find your “G-” ID you’ll need to
- In Google Analytics click on Admin
- Make sure you are in the correct account and property
- In the Property column, go into the Data streams
- Click the data stream for your website
- Your “G-” ID appears in the top right
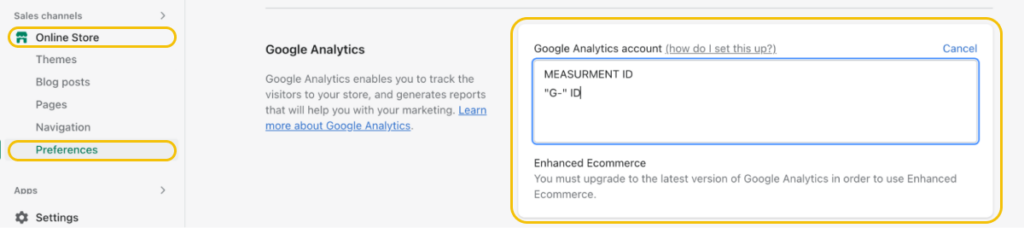
So, the next step is to paste the “G-” ID to your Shopify and this is really simple to do.
All you need to do is go to your Shopify admin. From there you go to Online Store > Preferences.
Find the Google Analytics section and paste your “G-” ID. Finally, that’s it. Don’t forget to click Save.
By following these steps, you can set up GA4 for your Shopify store and start collecting valuable insights into your store’s performance. This will allow you to make informed decisions to drive success for your business.
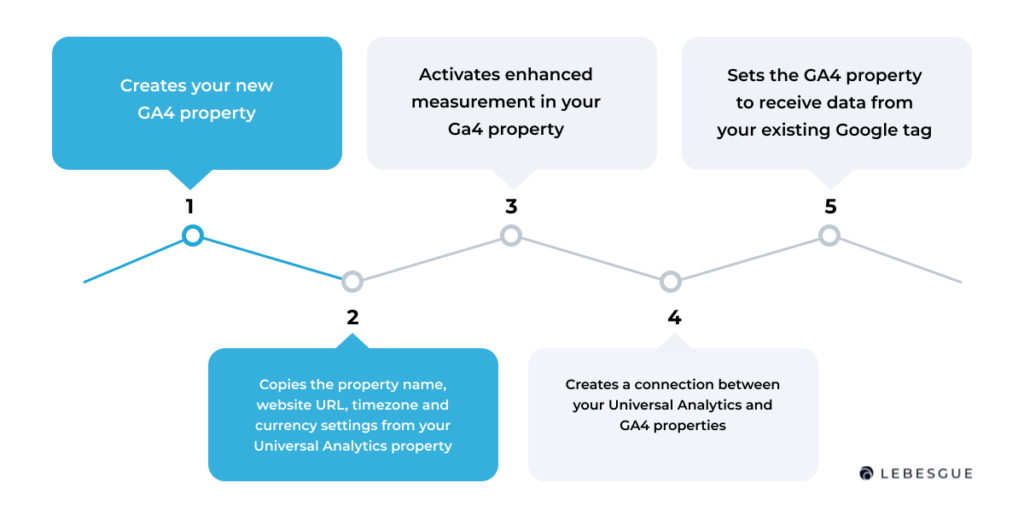
Add Google Analytics 4 property to a site with Universal Analytics
You can use the GA4 Setup Assistant to create a new GA4 property that will collect data alongside your existing Universal Analytics property.
In fact, your Universal Analytics property will continue to function as usual, with no changes made to it. You can easily access both properties through the property selector or Admin screen.
How GA4 Setup Assistant works
The GA4 Setup Assistant wizard does not transfer historical data to your new GA4 property. This means that your GA4 property will only collect data going forward. To access historical data, you can refer to the reports in your Universal Analytics property.
How to use GA4 Setup Assistant
For using the GA4 Setup Assistant you need the Editor role for the account. You can use this wizard regardless of whether your website pages have a Google Analytics tag (gtag.js or analytics.js), a Google Ads tag (gtag.js), or a Google Tag Manager container.
- In Google Analytics, click Admin
- In the Admin column, make sure that your desired account is selected.
- Select the Universal Analytics property that currently collects data for your website. You select this in Property Column.
- Click GA4 Setup Assistant in the Property column. It’s the first option in the Property column.
- Click Get Started under I want to create a new Google Analytics 4 property
- On the pop-up screen, you’ll have one of the following options, depending on how your site is currently tagged: Create and continue or Create property
- On the Set up Google tag page, select the option that best describes your situation and follow the instructions to finish creating your new GA4 property: Use the Google Tag found on your website, Use a Google tag you already have, and Install a Google tag.
Next steps with your new GA4 property
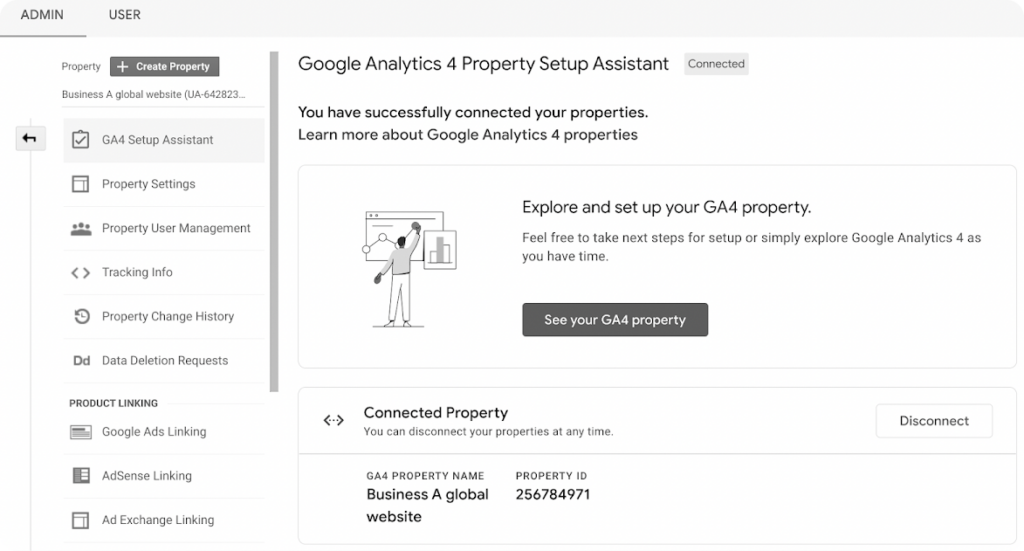
Once you’ve completed the setup wizard, you should see a message at the top of your Google Analytics 4 Property Setup Assistant page that says “You have successfully connected your properties”.
It’s a good idea to make a note of your GA4 property’s name, which will be different from your Universal Analytics property name.
To access your new GA4 property, click on the “See your GA4” button. From here, you can use the GA4 Setup Assistant to finish setting up your property by configuring recommended features and settings.
Keep in mind that Setup Assistant in Google Analytics 4 properties can help guide you through the process. It can take up to 30 minutes for data to begin appearing in your GA4 property.
Automatically Migrate Your Shopify Store to GA4
However, you can automatically migrate from the Universal Analytics tag to Google Analytics 4 stages in a just few steps.
To begin setting up GA4 on your Shopify store, you need to complete the following:
- Create a GA4 property in your Google Analytics account
- Add GA4 tags to your Shopify store.
Step One: Set up a GA4 Property
As we mentioned, to create a GA4 property, you must have an editor role for your Google Analytics account.
For setting up GA4, you need to create a new GA4 Property and link it to your Shopify Store. Once you create the Property, you will need to generate a web data stream and obtain the Measurement ID, which will be used in the next step.
Step two: Adding Google Analytics 4 Tags to your Shopify
During the GA4 tags setup process, you may be prompted to install the Google Channel if you haven’t already. Let’s see how you can add Google Analytics 4 tags to your Shopify.
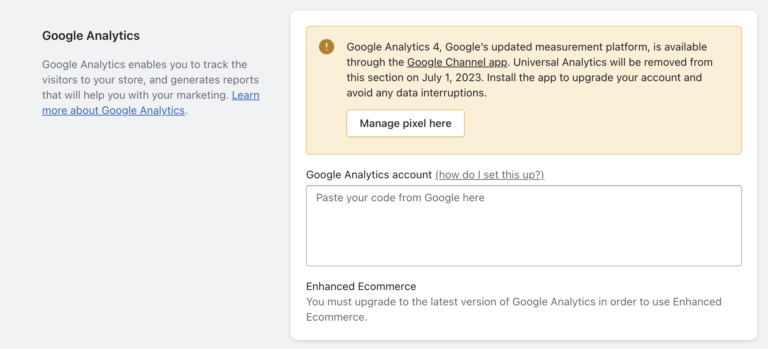
First, you need to go to Shopify admin. From there you need to click on Online Store> Preferences.
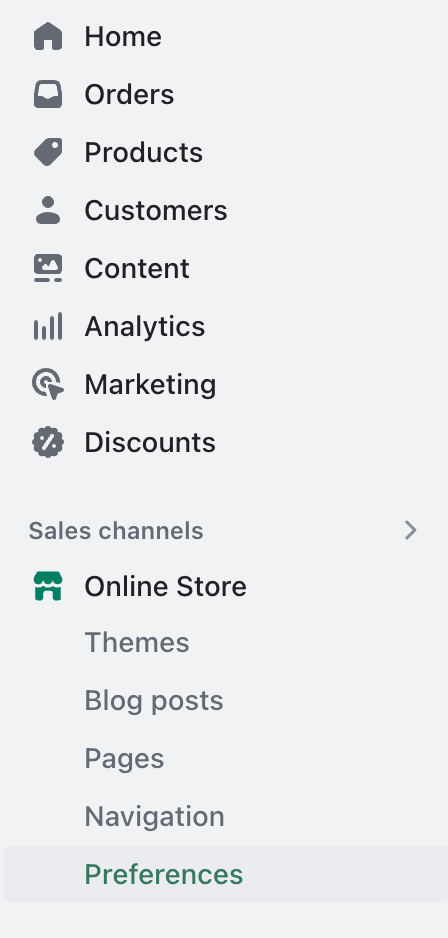
After you click on Preferences, you need to scroll down to the Google Analytics section and click on Manage Pixel here.
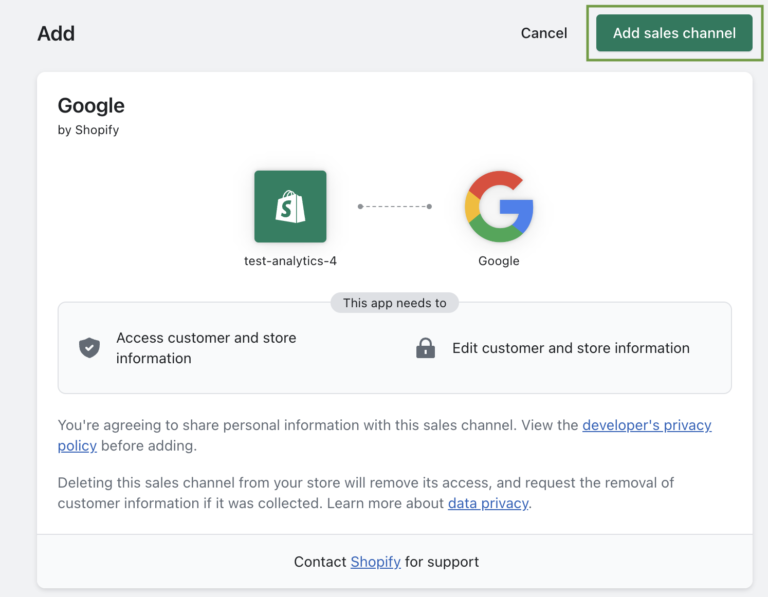
The next thing to do is to install the Google Channel app if you still don’t have it. If you follow the steps so far, you’ll get the automatic option to install the Google Channel app. Now, click on the Add Sales channel.
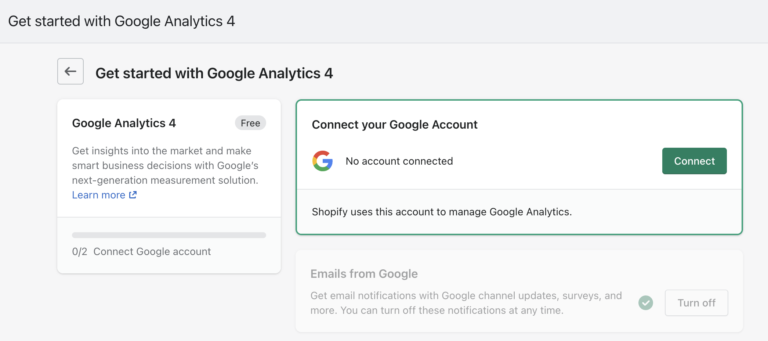
Now, it’s time to Connect your Google Account. To do so, click on Connect.
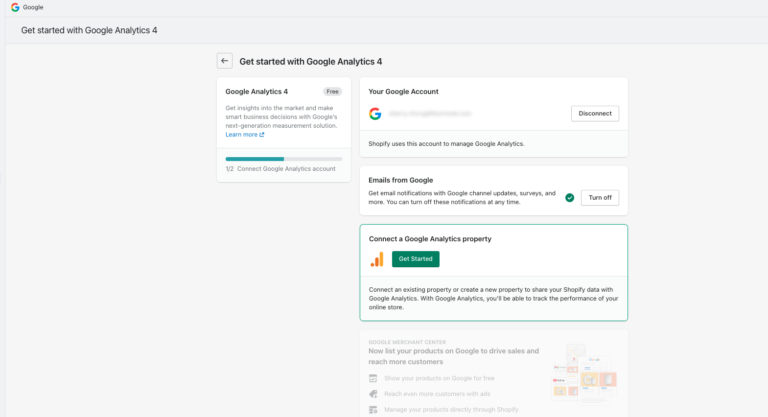
If you already have a Google Analytics account connected, you just need to click on Get Started on Connect a Google Analytics property section.
So, at the end of setting up your GA4 for your Shopify store, select the Measurement ID for the GA4 property you want to connect to your Shopify Store.
After that, click on Connect your Google Analytics 4 property.
And that’s it. You added GA4 tags to your store. After this, depending on how you used Universal Analytics, you can do the following:
- Migrate audience to GA4 if you used Universal Analytics audiences
- Migrate conversion tracking to GA4 if you used Universal Analytics to track Google Ads conversions
- If you didn’t use Universal Analytics then your migration is done
The benefits of automatic GA4 migration for Shopify Store
Why do we choose automatic migration over manual?
Well, if you manually migrate to GA4, you’ll need to go through a complicated process of adding and updating tags and code to your Shopify store. This approach can be time-consuming and may require technical knowledge.
On the other hand, automatic migration to GA4 simplify the process for you. It’s a faster and easier way to upgrade to the latest version of Google Analytics and provides more accurate data about your store’s performance.
Summing Up
And that’s it. Now that you know how you can migrate to Google Analytics 4 you can use all the valuable features that it offers. Whatever method you choose, manual or automatic migration, make sure to follow the steps for proper installation of GA4.
In case you have a problem during the migration to GA4, don’t hesitate to contact us. We’ll be more than happy to help you.