When you’re running ads on Google intending to acquire new customers, it’s important to establish a customer list. By doing so, you can exclude existing customers who have already made a purchase.
This approach provides more cost-effective targeting, ensuring you don’t blend prospects with the retargeted audience. If you mix your audience, it’s hard to know how much it costs to get new customers.
Without further ado, let’s see how you can create a customer list for Google Ads and effectively use it in your campaigns.
In Google Ads, a customer list is a collection of information about your existing customers or leads.
This information typically includes email addresses, phone numbers, or other identifiers that allow Google to match them to users on its platform.
Once uploaded or imported into Google Ads, this list can be used for various purposes, such as targeting specific ads to existing customers, excluding them from certain campaigns, or creating lookalike audiences to reach similar potential customers.
Essentially, a customer list helps you tailor your advertising efforts to people who have already shown interest in your business.
Create a Customer List
To create a customer list on Google Ads, first, you need to export the customer list form your Shopify or WooCommerce store.
Here are step-by-step guide to upload a customer file to your Google Ads account.
Upload a customer data file
1. Sign in to your Google Ads account. Click on the Tools icon.
2. Next, click on the drop-down menu labeled “Shared library”. Select “Audience manager”
3. Once in Audience Manager, click on the “Your data segments” located at the top of the page.
If you enable “Turn on conversion-based customer lists” in your account settings, Google will automatically generate customer lists for each specific conversion goal.
4. Click on the plus button (+) to create a new segment.
5. From the drop-down menu, select “Customer list”.
6. Give your new segment a name that helps you identify it easily.
7. After that you need to upload your customer data file in CSV format. Google will automatically identify whether your data is hashed or unhashed.
8. If you agree with Google’s policies regarding the collection and sharing of customer data, check the box labeled “This data was collected and is being shared with Google in compliance with Google’s Customer Match policies“.
9. Decide on the membership duration for your customer list. The default is unlimited, but you can set a custom time limit if needed.
10. Click on the “Upload and create” button to proceed with the upload process.
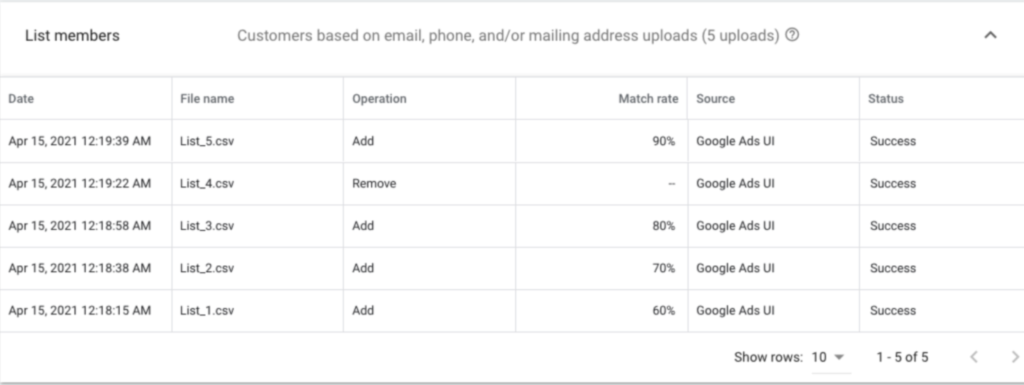
11. Track the progress of uploading your data file under “Audiences list”. The process may take up to 48 hours to complete.
12. Once your data has been successfully uploaded, you’ll be directed to a file upload success page. Here, you’ll find the information about the number of rows that were uploaded successfully and your match rate percentage.
Audience Exclusions
Just as you optimize your keywords by excluding certain terms, you can also fine-tune your campaigns by excluding specific audience segments that might not align with your goals.
While you can’t exclude audience segments when initially setting up a campaign, you can always make adjustments later on.
Exclude Specific Audience Segments From Your Targeting
1. In your Google Ads account, navigate to the Campaigns icon (Campaigns Icon) and click on it.
2. From the section menu, select “Audiences, keywords, and content” from the drop-down menu.
3. Choose “Audiences” from the options.
4. In the “Exclusions” module, you’ll see a list of excluded segments, along with their type, where they’re excluded from, and the level of exclusion.
5. To remove exclusions, check the blue checkbox next to the excluded segment, then click on “Remove” in the blue menu bar.
6.If you need to edit exclusions, click on “Edit Exclusions.”
7. From the drop-down menu under “Exclude from,” select either “Campaign” or “Ad group.”
8. Check the blue checkbox next to any segments you wish to exclude. If you want to remove any connected segments, click on the red “x” mark next to them.
9. Finally, click on “Save Audience Segment Exclusions” to apply your changes.
Summing Up
By creating a customer list, you can ensure that you’re not wasting your budget on targeting audiences who have already made a purchase.
This targeted approach not only helps you conserve your advertising spend but also improves the efficiency of your campaigns.
However, creating a customer list is just the first step. It’s equally important to regularly update and maintain this list to ensure its accuracy.
With a strategic approach to audience targeting and conversion tracking, you can maximize the effectiveness of your Google Ads campaigns and drive better results for your business.
⭐⭐⭐⭐⭐
100+ five-star reviews on Shopify App Store
No comment yet, add your voice below!